Tuesday, August 20, 2013

Wrapping up finishing touches on SS Dresses

Ok here is the wrap up tutorials for the Angie dress from Scientific Seamstress . Here is the wrap up portion of the Plaid Angie dress with peter pan collar attached using the bias bind method. It works well even adding the collar. I would suggest basting the collar, 1/8 of an inch , then doing the binding to keep it from shifting.

Baste collar on using 1/8" seam allowance. Follow bias finish to have bias inside the garment instructions in your pattern. Then when you go to sew the other side down, flip the collar up and stitch along the outer edges, under the collar area.

Clip your curves before sewing down the inner edge. And take out the bulk at the side/shoulder seam to reduce bulk.

And thats about it! I gave the collar a good press and it stayed down. If you want, you can fold the collar down and edge stitch it in place.I found after I washed and dried it, the collar needed a good press and then was fine.

Ok now the flat ribbon tutorial. Make your sash per instructions in the Angie pattern. Then make a second one half the total length. Finish all edges. Then you are going to lay it out and figure your lengths desired.

I did three loops evenly spaced each end. Just play with it to see how big you want it. Then take the middle section, do a half fold up, and bring the fabric down behind the back. Then tack it down with a few hand stitches thru the middle. Also tack down the bow ends one or two stitches to keep the bow from falling forward when worn.Do not tack thru the very top layer of the bow ends, just thru the bottom of the top end thru the back.
Once you are done tacking down the middle and thru all bow end layers,dont go thru the very top bow end layer, you can wrap the fabric end around to the back of the bow. Slip stitch it closed, and then attach to the sash middle. And there you go! a flat bow sash belt for a dress or tunic!

Sunday, August 18, 2013

Peter Pan Collar Tutorial for Sis Boom/ Scientific Seamstress Angie Dress

I must confess, I have been sewing for myself this summer. I came across this pattern , the Angie Dress from Sis Boom/ Scientific Seamstress and had to give it a go! I made one with a lace overlay bodice that came out smashing. And I had been eyeing a peter pan collared dress on one of my fav shops. So it dawned on me that hey, this pattern could work with this collar. I made this dress:
And so, here is how I drafted a peter pan collar for it.

First, print out your bodice pieces in the size needed, I went with the standard neckline. Grab your swedish tracing paper, or other paper you can see thru. Joanns also has a grid thin fabric that works well for drafting too. You lay your paper over the front bodice piece and trace the neckline.

Decide how wide you want your collar. I choose 3 inches. It places the collar just a few inches from the sleeve edge. Mark this along the shoulder seam. You have 1/4" seam allowance on this pattern and your collar seam allowance is the same as your pattern. So you do not need to add it in.

Now go to the front of the neckline and mark the same measurement, in my case 3" inches down, make a mark.

I use a drafting ruler to then draw my curved line up to the shoulder line I previously marked. Keep it the same measurement all along the line. Feel free to make the rounded front edge in whatever shape you like: big and round or thin and slightly rounded, up to you. Note you will be cutting 2 pairs ( total of 4 pieces) of mirror image pieces for the front collar pieces.

Follow the same proceedure for the back piece. Be sure you note that you will be cutting the 2 back collar pieces on the fold.

Cut your pieces.

You end up with 4 front pieces: mirror imaged and 2 back pieces cut on the fold.
Pin your collar pieces at each shoulder seam. Sew using a 1/4" seam allowance.
I open them up and finger iron the seam then move onto pinning them right sides together.
Sew your outer edge ONLY. The inner edges will be either bias bound finished or if you are lining your bodice, when you construct the bodice outer and lining, you will sandwich them together.
Carefully clip your rounded edges or I use pinkering scissors and just cut the edges to give a clean rounded edge. Make sure you clip the shoulder seams to help reduce the bulk at the seam.
Turn collar right side out, use a chop stick, boning tool, or other utensil to run along the seam to help it come out. Give the collar a good ironing. Top stitch if you like.

Now that you have your collar you can attach it in a few different methods. I am making another Angie Dress this week using the bias tape method.

If you are lining your bodice, take your collar, lay it on top of the outer bodice fabric, right side up. The peter pan collar ends meet right in the middle. Either mark the neckline center or give it a quick lil iron to help you center the collar points. Lay the lining bodice right side down. Sandwiching the collar between the two. Pin thru all layers. You can also baste the collar then sandwich if it seems to be too many layers. You then sew your seam allowance. turn it right side out and proceed to the bias binding of the sleeves. And the rest of the pattern.

I hope this helps you design the Angie Dress of your dreams! I know I love mine and will be making more garments adding a peter pan collar here 'n there!

Saturday, June 23, 2012

Snap on Serger scrap Bag Tutorial

I made the sewing caddy using this tutorial from How Joyful.

But as I serge alot when I make diapers, and make a huge mess. I decided to craft a lil serger scrap bag that snaps on with KAMsnaps so I can help keep my pretty sewing room, well PRETTY. :) Here is the tutorial for the serger scrap bag. Feel free to use it as you wish. If you sell any ,just give me credit! Thanks! And if you want one really bad, you can send me a message and I can make one for you. Check out my Facebook page as well, Gaia's Treasures

List of materials: One rectangle, 14" long x 20"wide , of a contrasting fabric you used for your caddy.

one piece of corset boning- 12" long,

3/4" braided elastic 4 " long,

2- strips of fabric for the straps: 7" long x 4" wide,

4- KAMsnap caps,

2-KAMsnap sockets,

2- KAMsnap studs, coordinated to your fabrics!

Or velcro or other method of attaching your bag to your caddy.

Seam allowance of 1/2" on all pieces.

Step One: Cut your fabrics.

Step Two : make your straps. Fold in the sides about half an inch,and the top edge, pin then sew the long side and top edge.

Step Three: Fold your large rectangle into half, short side together, pin and sew or serge.

Step Four: Square up your end and make pretty:)

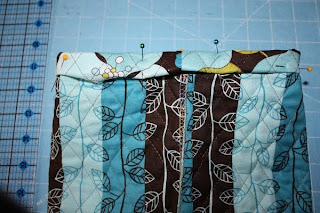
Step Five: Fold your bag bottom to make the square bottom. It should look like this, and as even as possible.

Step Six: Measure from the start of the corner to 1 1/2 inches down. Mark with your tailors pen and then use your ruller to draw a sewing line. Sew the corners, and cut off the excess leaving about 1/4 seam.

It should look like this:

Step Seven: Now onto the casing! Fold down the top layer 1/2 an inch and then 1" down again. Pin in place, using your pins to make a start and stop point. You need to leave a 1-2" opening to fit your boning into. Be sure to back stitch both starting and stopping points.

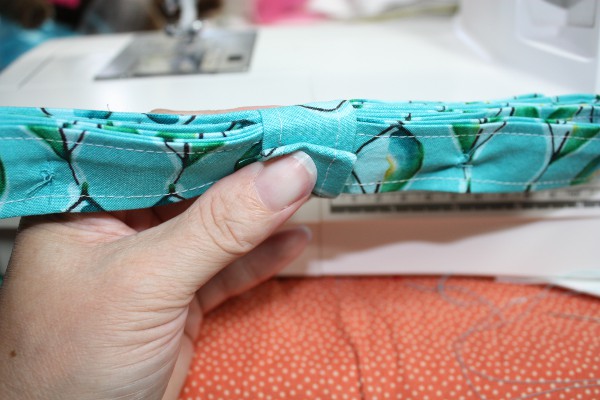
Step Eight: Insert the piece of boning into your casing. I find putting a lil tape on the end keeps it from catching on threads etc as you guide it in. It is stiff enough to push on thru.

Go across til you form a semi circle with the back seam centered and equal. Should look like this when you are done.

Step Nine: Attaching your straps. I use a box stitch anytime I do straps on bags. Its sturdy and I know it will hold well. Pin your straps and sew them in. BE SURE you do NOT sew over the boning. Your machine will not like it, no no no.... boning BAD for the machine....:)

Step Ten: Add the elastic between the straps. This will give you a good fit over the table edge from your caddy. I use a 3 step zig zag and pull ( with your needle down in the fabric) about 90% all out. Trim the excess.

Step Eleven: Add your KAMsnaps to the straps per their instructions, either with pliers or snap press. I did my studs on the straps and sockets on the caddy. For the caddy , I placed my straps with the studs installed, hard on my caddy about 1 1/2 " from the edge. and spaced about 2 inches apart. TIP: If you press down on the studs, it will leave a lil circle which you can then use your fabric marker to make a placment for your socket. You can use velcro as well. Just sew on a square of hook to the ends of your straps.

Step Twelve: place your wonderful hard working serger, aka "Sugar Baby" onto it's lovely caddy.... then bust out a dozen diapers, filling your new scrap bag up!!!

Friday, May 11, 2012

Flats/Handwashing Challenge

So I bought a clothes line dryer for the handwashing/flats challenge. It is May 21st thru the 26th. Look up Flats/handwashing challenge if you want to participate. :) But basically you can use flats and covers for diapering your little ones, and handwashing only, no washer no dryer for a week. Simple and easy right? So I figured flats would be handy for our July trip to Granma's house and my nifty new dryer folds up and is portable to go with us for camping trips! My boys were intrigued by the new contraption in our yard. Logan was commenting about the OLD FASHIONED dryer, lol. I grew up with clotheline drying and tub stomping to do our laundry. So for me, it was old hat. But the clothepins and the lines were a novel idea to the boys. I think this challenge is going to be interesting for us as a family. :)