I made the sewing caddy using this tutorial from How Joyful.
But as I serge alot when I make diapers, and make a huge mess. I decided to craft a lil serger scrap bag that snaps on with KAMsnaps so I can help keep my pretty sewing room, well PRETTY. :) Here is the tutorial for the serger scrap bag. Feel free to use it as you wish. If you sell any ,just give me credit! Thanks! And if you want one really bad, you can send me a message and I can make one for you. Check out my Facebook page as well, Gaia's Treasures
List of materials: One rectangle, 14" long x 20"wide , of a contrasting fabric you used for your caddy.
one piece of corset boning- 12" long,
3/4" braided elastic 4 " long,
2- strips of fabric for the straps: 7" long x 4" wide,
4- KAMsnap caps,
2-KAMsnap sockets,
2- KAMsnap studs, coordinated to your fabrics!
Or velcro or other method of attaching your bag to your caddy.
Seam allowance of 1/2" on all pieces.
Step One: Cut your fabrics.
Step Two : make your straps. Fold in the sides about half an inch,and the top edge, pin then sew the long side and top edge.


Step Three: Fold your large rectangle into half, short side together, pin and sew or serge.
Step Four: Square up your end and make pretty:)

Step Five: Fold your bag bottom to make the square bottom. It should look like this, and as even as possible.

Step Six: Measure from the start of the corner to 1 1/2 inches down. Mark with your tailors pen and then use your ruller to draw a sewing line. Sew the corners, and cut off the excess leaving about 1/4 seam.

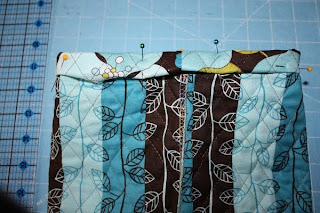
Step Seven: Now onto the casing! Fold down the top layer 1/2 an inch and then 1" down again. Pin in place, using your pins to make a start and stop point. You need to leave a 1-2" opening to fit your boning into. Be sure to back stitch both starting and stopping points.


Step Eight: Insert the piece of boning into your casing. I find putting a lil tape on the end keeps it from catching on threads etc as you guide it in. It is stiff enough to push on thru.


Step Nine: Attaching your straps. I use a box stitch anytime I do straps on bags. Its sturdy and I know it will hold well. Pin your straps and sew them in. BE SURE you do NOT sew over the boning. Your machine will not like it, no no no.... boning BAD for the machine....:)

Step Ten: Add the elastic between the straps. This will give you a good fit over the table edge from your caddy. I use a 3 step zig zag and pull ( with your needle down in the fabric) about 90% all out. Trim the excess.

Step Eleven: Add your KAMsnaps to the straps per their instructions, either with pliers or snap press. I did my studs on the straps and sockets on the caddy. For the caddy , I placed my straps with the studs installed, hard on my caddy about 1 1/2 " from the edge. and spaced about 2 inches apart. TIP: If you press down on the studs, it will leave a lil circle which you can then use your fabric marker to make a placment for your socket. You can use velcro as well. Just sew on a square of hook to the ends of your straps.

Step Twelve: place your wonderful hard working serger, aka "Sugar Baby" onto it's lovely caddy.... then bust out a dozen diapers, filling your new scrap bag up!!!


